Hey there, game development enthusiasts! So, you’ve decided to dive into the world of Construct 3 to bring your gaming ideas to life. That’s an awesome choice! Construct 3 is a fantastic tool for both beginners and seasoned developers. It’s user-friendly, and with a little bit of guidance, you’ll be navigating its interface like a pro in no time. In this post, we’ll break down the essentials of how to use Construct 3 interface, and believe me, it’s simpler than you might think. So, sit back, grab a cup of coffee, and let’s get rolling!
Read Now : Media Content Restrictions Internationally
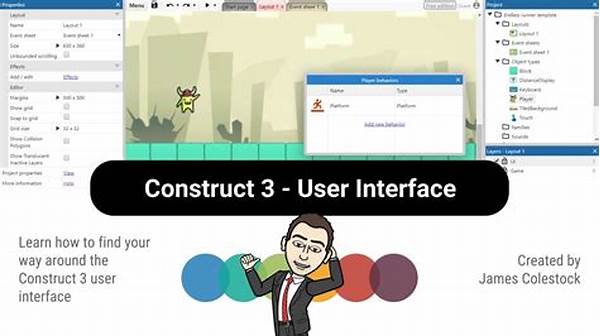
Getting Started with Construct 3
To kick things off, let’s talk about how to use Construct 3 interface for the first time. Once you open Construct 3, you’ll be greeted with a clean and intuitive layout. The central part of your screen is known as the layout view. Here, you can drag and drop objects and precisely place them where they belong. This is your canvas where the magic happens, and everything starts taking shape. On the left, you’ll find the project panel, a neat place to manage your project files and assets like sounds and images. Take some time to familiarize yourself with these panels because they’ll be your best friends as you venture further into game development. Just remember, practice makes perfect!
Another essential component of the Construct 3 interface is the event sheet. You’ll find this tab next to your layout view. Here, you can create all the logic behind your game without having to write a single line of code. It’s almost like having a conversation with your game: “When this happens, I want you to do that.” Pretty cool, huh? And because Construct 3 adopts a visual scripting method, it’s particularly great for those who might not be so confident with traditional programming. Understanding how to use Construct 3 interface effectively will help you harness the full potential of this tool and streamline the work process.
Lastly, let’s not overlook the properties bar on the left. This section allows you to delve deeper into the specifics of any object you click on. Size, position, behavior settings—you name it, it’s all there waiting for you to tweak. As you get more comfortable, you’ll find yourself using the properties bar more often to refine your game down to every last detail. So explore, experiment, and most importantly, have fun figuring out how to use Construct 3 interface. It’s an adventure in creativity!
Essential Features to Explore
1. Drag-and-Drop Functionality: Master how to use Construct 3 interface with ease by using the drag-and-drop feature. It makes placement and movement of objects simple and efficient.
2. Event Sheets: These are the backbone of creating game logic. Learning how to use Construct 3 interface with event sheets allows you to make your game interactive without coding.
3. Asset Management: Managing your assets directly within the interface keeps everything organized and easy to access. Familiarizing yourself with this feature is crucial for streamlined development.
4. Behavioral Add-ons: Want to make your character jump? Add behaviors! Understanding how to use Construct 3 interface with behaviors can add life to your gameplay.
5. Testing and Debugging Tools: Always preview your game within the interface to catch bugs early. How to use Construct 3 interface efficiently often involves utilizing these built-in testing tools.
Enhancing Your Game Development Skills
Okay, so now that you’ve got a handle on the basics, how about we level up your game development skills with some advanced tips on how to use Construct 3 interface? One of the greatest advantages of Construct 3 is its flexibility. As you gain confidence, try customizing the interface to fit your workflow. Rearrange panels and experiment with different layouts. Everyone has their own style, and the interface caters to that perfectly.
Another advantage is the community and available tutorials. Don’t be afraid to reach out! The Construct community is incredibly supportive, and there are tons of tutorials online that can help you navigate through any specific challenges you may have with the interface. There’s always something new to learn, so keeping engaged with the community will keep you on top of your game.
Lastly, let’s talk about animations and polished visuals. Construct 3 makes it exceptionally easy to import and integrate animated assets into your project. Explore the animations editor within the interface to give your game an aesthetic edge. Adding fluid graphics and animations can really set your game apart, and understanding how to use Construct 3 interface can make this process delightfully smooth.
Expanding Your Creative Horizons
Getting better every day is about pushing the boundaries of what you thought possible. By diving into plugins and effects, you can significantly expand what your game can do using the Construct 3 interface. These tools give you the power to incorporate shadows, lighting effects, and more, all through the simple interface.
Moreover, consider collaborating with others on your projects. Construct 3 allows for easy sharing and collaboration, showcasing the seamlessness of its interface. Whether you’re working with friends or connecting with new developers, multiple perspectives can invigorate your project with fresh ideas.
Read Now : Adaptive Grid Simulation Strategies
Don’t forget to take advantage of testing different devices directly from Construct 3. This feature will help you see how your game operates in different environments. Embrace the analysis tools provided within the interface for understanding player engagement. Each statistic can offer new insights on how to improve gameplay and alter parts of the interface to suit your needs better.
Advanced Interface Tips
As we delve deeper, let me share a few more golden nuggets on how to use Construct 3 interface. First off, familiarize yourself with the keyboard shortcuts. These small time-savers can make working in the interface a breeze once you’ve committed them to memory.
If you’re looking to speed up production, master the art of cloning objects within the interface. When you need several instances of the same item, this feature is a lifesaver and will keep your project consistent and clean.
Another tip is to utilize the global variables within the event sheets. They act like the memory banks of your game, storing essential data that can be accessed throughout your project. With global variables, you’ll ensure that key elements of your game remain consistent, no matter where the player is in the game.
In addition, don’t underestimate the power of the undo button. No need to fret over mistakes; the interface’s history feature is always there to catch you. Also, layering objects can add depth to your game visuals. Explore the layers panel within the interface to organize your elements effectively.
Consistency across your project is crucial, so ensure naming conventions are followed religiously when using the Construct 3 interface. This will make it easier to locate and manage elements later on.
Finally, as you grow more adept, try your hand at external plugins. These can expand the capabilities of the Construct 3 interface, offering new possibilities and features that go beyond the basic offerings.
Conclusion
As we wrap up this journey on how to use Construct 3 interface, remember, patience is key. Take your time to explore, make mistakes, and learn from them. The interface is designed to be user-friendly and adaptable, paving the way for your creativity to shine.
Every game developer has a unique style, and the beauty of Construct 3 is that it allows that individuality to flourish through its dynamic interface. Don’t shy away from adding personal touches as you become more familiar with the tools available.
In the world of game development, the Construct 3 interface is your canvas, and you are the artist. So keep experimenting, seek out new techniques, and most importantly, enjoy the process. Happy game developing, and may your games come to life in the most amazing ways!