Hey there, fellow game developers! If you’re diving into the world of game development with Construct 3, you’ve landed on the right page. Navigating the Construct 3 UI can be a bit intimidating at first, but fear not. In this tutorial, we’ll walk you through the essentials of the interface, helping you get comfortable and ready to create the next big indie hit. So, grab your favorite cup of coffee, and let’s explore!
Read Now : Hitbox Calibration For Complex Models
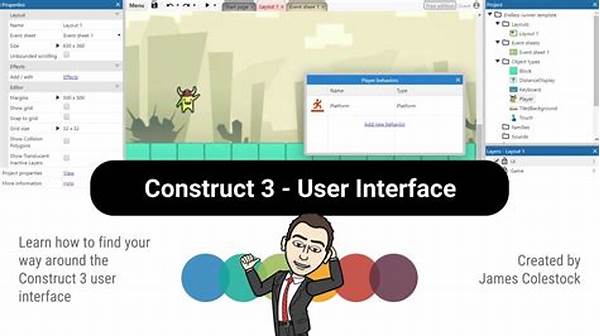
Getting Started with Construct 3 User Interface
Construct 3 is a powerful tool that offers a visually rich interface, jam-packed with features. Upon opening Construct 3, you’re greeted with its sleek layout. On the left side, you’ll find the Project Panel, which acts like your game’s control center. Here, you manage your game’s assets, from sprites to sound files. At the heart of the interface is the Layout View, where the magic happens – your canvas for creativity and design. On the right is the Properties Bar, which becomes your best friend as you adjust the properties of objects: position, size, behavior—you name it. The construct 3 user interface tutorial focuses on familiarizing you with these essential components, helping you rhythmically flow in your game development journey.
Construct 3’s UI is clean, and once you get the hang of it, you’ll find it quite intuitive. One of the standout features is the Event Sheet, located along the top menu. Think of the Event Sheet as your game’s brain, where you craft the logic that brings your game to life. This feature allows for event-based programming, making complex functions a breeze even for newbies. Our construct 3 user interface tutorial will give you tips on how to strategically order events and conditions for seamless gameplay mechanics, ensuring an enjoyable player experience.
Creating a new project in Construct 3 is like opening a blank canvas brimming with potential. As you interact with the interface more, try experimenting with toolbars and menus. The toolbar atop includes everything from saving your project to previewing your game. Meanwhile, menu options give you access to layers, which play a significant role in how objects overlap and look onscreen. This construct 3 user interface tutorial is designed to make sure you understand the basics so well that you can confidently explore these additional features with ease.
Essential Tips in Construct 3 User Interface Tutorial
1. Familiarize Yourself with the Layout
The construct 3 user interface tutorial starts by encouraging you to familiarize yourself with the Layout View, where you’ll spend most of your time designing your game world.
2. Master the Project Panel
Use the Project Panel to keep track of every asset within your game. Staying organized is key in the construct 3 user interface tutorial for efficient game development.
3. Understand the Event Sheet
Master the Event Sheet early on in this construct 3 user interface tutorial. It’s where all logic is implemented, making it vital for developing interactive elements.
4. Utilize Properties Bar
The Properties Bar helps you fine-tune your objects. Paying attention to details here can make a significant difference in your game’s aesthetics and functionality.
5. Experiment with Layers
Layers allow you to organize objects within scenes. This construct 3 user interface tutorial strongly recommends exploring layers to enhance depth and visual interest.
Exploring Advanced Features in Construct 3 User Interface
Moving deeper into the Construct 3 user interface tutorial, it’s time to delve into the advanced features that transform your basic game into something extraordinary. One such feature is the built-in debugger, a highly underrated tool that helps you monitor your game’s performance in real time. By diving into the debugger, you can identify and fix errors swiftly, ensuring a smoother gameplay experience. This aspect of the construct 3 user interface tutorial teaches you how to leverage this tool to keep track of variables, monitor performance, and catch bugs before they become an issue.
The construct 3 user interface tutorial also highlights the Asset Store, a game-changer for any developer. Struggling to find the perfect sound or sprite for your game? Simply hop over to the Asset Store, integrated seamlessly into the Construct 3 environment, and download what you need. The ease of access and wide variety simplifies the process, allowing you to focus on creativity rather than resource gathering. With a few clicks, you can enhance your game’s audio-visual flair, giving it a professional edge.
The collaboration features in Construct 3 are an added bonus, especially for team projects. If you’re working with others, the construct 3 user interface tutorial shows you how to use these features efficiently, making it a breeze to share ideas and progress without leaving your project environment. The seamless integration allows for real-time collaboration, version control, and instant communication, elevating your team’s productivity.
Frequently Asked Questions in Construct 3 User Interface Tutorial
1. How do I customize my toolbar?
To enhance your efficiency, the construct 3 user interface tutorial includes customizing the toolbar. Simply drag and drop tools to where they’re most accessible for you.
2. What’s the best way to handle object behaviors?
Dive into the Behaviors tab frequently, as this construct 3 user interface tutorial suggests experimenting with different behaviors to see what best suits your game mechanics.
3. Is there a shortcut guide for Construct 3?
Read Now : Performance-energy Trade-off Algorithms
Yes, the construct 3 user interface tutorial recommends printing out the keyboard shortcuts from the official documentation to streamline your workflow.
4. How do I backup my projects?
Make regular backups by saving to the cloud. This construct 3 user interface tutorial emphasizes the importance of regularly saving your progress in multiple locations.
5. Can I personalize my project settings?
Of course! This construct 3 user interface tutorial suggests tweaking settings like background colors and grid sizes to tailor the workspace to your preferences.
6. How do I add new assets?
Simply drag and drop your assets into the Project Panel. The construct 3 user interface tutorial details how to manage and categorize these assets for easy access.
7. What’s the use of Families in Construct 3?
Families group similar objects together to apply shared properties or behaviors. The construct 3 user interface tutorial encourages their use for efficient coding practices.
8. How do I optimize my game for mobile?
Test using the various screen resolutions and scaling options provided. This aspect of the construct 3 user interface tutorial helps ensure your game performs well on different devices.
9. What debugging tools are available?
Utilize the Construct 3 debugger for real-time analysis. The construct 3 user interface tutorial makes it crucial to incorporate debugging to eliminate issues promptly.
10. How do I integrate third-party plugins?
Through the Addon Manager, you can easily incorporate plugins. The construct 3 user interface tutorial advises exploring plugins to add extra functionality to your project.
Conclusion of Construct 3 User Interface Tutorial
Embarking on the Construct 3 user interface tutorial journey can seem daunting at first, but once you get the lay of the land, it becomes an enjoyable ride of creativity and innovation. By consistently practicing and exploring the interface, you’ll soon find yourself moving with ease through the various panels and features.
Throughout this construct 3 user interface tutorial, we’ve explored the key components that make up the Construct 3 environment, from the intuitive Layout View to the powerful Event Sheet. Each segment is designed to equip you with the knowledge needed to tackle any game development challenge that comes your way. Whether you’re tweaking the Properties Bar or diving deep into debugging, each moment spent will refine your skills and develop your understanding.
The construct 3 user interface tutorial not only guides you through the basic and advanced features but also encourages you to explore and personalize your workspace. By doing so, you create an environment that fosters creativity and efficiency. As you continue to develop your games, remember that the Construct 3 community is vast and supportive. So don’t hesitate to reach out, share your progress, and shine brightly in the game development world!