Hey there, fellow game dev enthusiasts! If you’ve ever tinkered with GameMaker, you already know it’s a powerful tool for making games come alive. But what’s a game without stunning animations, right? Today, we’re diving into the art of creating animations with GameMaker Language. Whether you’re a seasoned programmer or just getting started, this guide will walk you through the process with ease and maybe a pinch of fun!
Read Now : **material Deformation Mechanics**
Understanding the Basics of Creating Animations with GameMaker Language
Alright, let’s kick things off with the basics. Creating animations with GameMaker Language isn’t just about making things move. It’s about breathing life into your games, adding those little details that make players go “Whoa, did you see that?” When you start with GameMaker Language, or GML for short, you’re stepping into a realm where code meets creativity. Don’t worry if it sounds intimidating at first; it’s more of a dance than a marathon. You’ll be working with sprites (your animated images) and creating sequences that make them hop, skip, and jump across your game world. It’s all about telling a story, one frame at a time!
Now, before you get too eager, remember that every animation begins with a sprite. In GML, these are your building blocks. Think of them as flipbook pages – each frame slightly different, and when you flick through them fast enough, magic happens! You’ll be scripting your animation sequences, adjusting frame rates, and playing around with loops. GameMaker’s sprite editor is your new best friend where you’ll redefine what those adorable pixel heroes of yours can do. Getting comfortable with GML opens up a universe where your imagination sets the limits.
Finally, let’s talk about why it matters. Creating animations with GameMaker Language isn’t just about the visuals; it’s about an immersive experience for your players. Smooth animations keep players engaged, creating a seamless narrative flow. It helps build atmosphere and injects emotion into your game. The main takeaway here? You are not just coding; you’re crafting experiences, tickling imaginations, and forging memories for your players. Now, are you ready to make some magic?
Tips for Creating Animations with GameMaker Language
1. Start Small: Begin with simple animations, like a walk cycle, to get a feel for the tools in GML. Creating animations with GameMaker Language starts with practice.
2. Use Layers Wisely: Use layers for different body parts or elements to add depth and flexibility in your animations.
3. Embrace the Timeline: GameMaker’s timeline feature can help you organize your animations logically and efficiently.
4. Optimize Performance: Keep an eye on frame rates and memory usage to ensure smooth performance.
5. Playtest Often: Test your animations in the game environment frequently to see them interact with game physics and other elements.
Tools You Need for Creating Animations with GameMaker Language
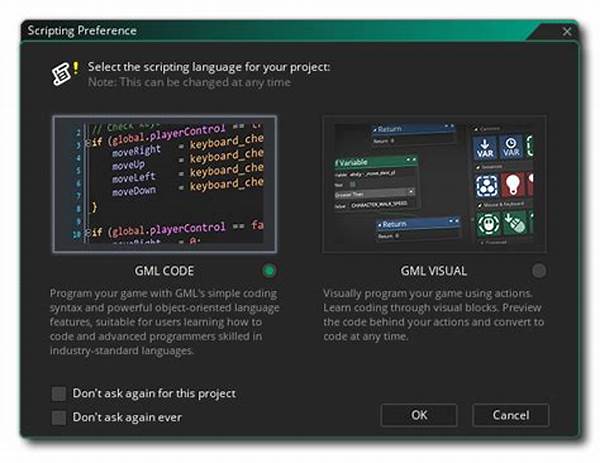
When you’re deep into the art of creating animations with GameMaker Language, the right tools are crucial. GameMaker Studio itself comes packed with a robust set of features that can handle most of your animation needs. The Sprite Editor, for example, is where you’ll spend a lot of your time fine-tuning each frame. And let’s not forget about the Room Editor, which offers a perfect playground to test those animations in real-time. The workspace is highly intuitive, letting you drag, drop, and flip frames with ease.
Beyond GameMaker Studio, consider integrating external tools for more advanced animation needs. Software like Aseprite or Photoshop can provide additional capabilities for designing complex sprite sheets. Once created, these art assets can be easily imported back into GameMaker for creating animations with GameMaker Language. Each of these tools offers unique strengths, so exploring them can significantly enrich your workflow. Remember, the goal is to create an efficient pipeline where creativity meets functionality, turning your ideas into animated wonders.
Lastly, don’t underestimate the power of community support. The GameMaker community is a treasure trove of tutorials, plugins, and script libraries. There’s no shame in borrowing a good script or two; it’s all part of the learning process. Engaging with fellow developers can provide fresh insights, new techniques, and, importantly, moral support. Animation is a skill built over time, and sharing experiences can help foster growth, making creating animations with GameMaker Language as collaborative as it is creative.
Common Challenges in Creating Animations with GameMaker Language and How to Overcome Them
Let’s face it; creating animations with GameMaker Language isn’t all rainbows and unicorns. Like any creative endeavor, it’s riddled with challenges that can leave you scratching your head. One common obstacle is sprite alignment, where characters might jitter or jerk awkwardly. A helpful trick is using alignment guides within the Sprite Editor to position each frame precisely. Make sure to maintain a consistent point of origin across frames to keep animations smooth.
Read Now : “minimizing Lag In Godot Games”
Another hurdle can be optimizing performance, especially for larger animations. The key is striking a balance between visual fidelity and game performance. Reduce the number of frames in your animations without sacrificing too much quality, and use compression techniques to manage file sizes. Also, ensure your game loops aren’t overwhelmed by too many simultaneous animations, as this can severely impact performance. Use scripting wisely to trigger animations only when necessary, keeping the load light.
Finally, there’s the challenge of injecting personality into your animations. This isn’t just a technical issue but a creative one, affecting how players perceive your characters. To overcome this, engage in thoughtful character design. Think about how a character’s walk or jump might reflect their personality. Use animation principles like squash and stretch, timing, and anticipation to bring life into movements. The more personality you infuse, the more memorable and engaging your game will become.
Best Practices for Creating Animations with GameMaker Language
Creating engaging and smooth animations takes some finesse. Here are some best practices to guide you along the way.
Advanced Techniques in Creating Animations with GameMaker Language
So, you’ve mastered the basics and now you’re ready to take your skills to the next level. Advanced techniques can elevate your game art from “meh” to mind-blowing. One advanced practice is using skeletal animation. Unlike traditional frame-by-frame animation, skeletal techniques allow for smoother and more dynamic movements. By manipulating the “bones” within a sprite, you can create complex animations without needing a hundred separate frames, making creating animations with GameMaker Language both efficient and impressive.
Another pro trick involves using shaders. Shaders can add stunning visual effects, like lighting and shadows, that give depth to your animations. It’s a more technical side of creating animations with GameMaker Language, but the payoff is phenomenal. With shaders, you can simulate realistic environmental effects, giving your game an extra layer of polish. Once you dive into shaders, there’s no looking back!
And for the truly ambitious, there’s particle animation. Particles can simulate weather conditions, explosions, magic spells, and more. When used wisely, particles can transform ordinary scenes into vibrant spectacles that captivate players. Each of these techniques requires time to master, but they are invaluable tools in your animation arsenal. Remember, every expert was once a beginner, and creating animations with GameMaker Language is a journey worth every step.
Conclusion: The Endless Possibilities of Creating Animations with GameMaker Language
Bringing animations to life in GameMaker isn’t just a skill—it’s an art form that combines coding prowess with creative vision. We’ve explored how creating animations with GameMaker Language can enhance your game’s storytelling, engage players, and provide immersive experiences. Whether you’re tweaking a character’s eye movement or orchestrating a breathtaking battle scene, each animation contributes to your game’s world-building.
By understanding the basics, leveraging the right tools, and applying advanced techniques, you’re equipped to tackle any animation challenge that comes your way. Remember, animation is a dynamic field, constantly evolving with technology and artistic trends. Keeping up-to-date and engaged with the community will sharpen your skills and ensure your animations remain fresh and relevant.
As you continue this creative journey, enjoy the process and remember why you started. Embrace the challenges, celebrate the milestones, and never stop experimenting. After all, the joy of creating animations with GameMaker Language lies in the endless possibilities it offers. Whether your goal is to craft a small indie masterpiece or work on blockbuster games, every animation counts. Happy animating, and may your sprites always dance gracefully across the screen!