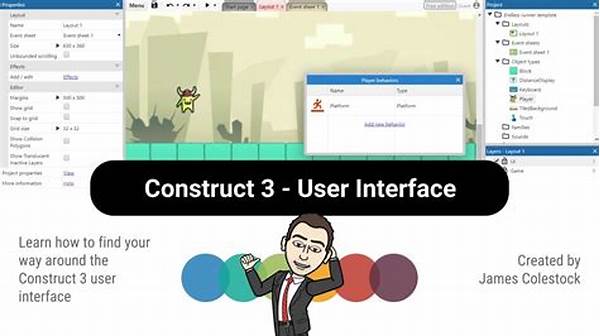
Hey there, game dev enthusiasts! If you’re a fan of Construct 3, I’m sure you love diving into your project and crafting something amazing. But wouldn’t it be awesome if you could tailor the interface to fit your workflow perfectly? Today, we’re chatting about customizing Construct 3 interface panels. Let’s dive in and explore how a few tweaks can turn your workspace into a productivity powerhouse!
Read Now : Depth Sensor Calibration Processes
Why Customize Your Construct 3 Interface?
Alright, first things first. Let’s talk about why you’d want to customize Construct 3 interface panels in the first place. Imagine you’ve got a bustling art studio. Every brush, canvas, and easel should be arranged just the way you like it, right? The same logic applies to Construct 3! When you tailor the interface panels, you make your creative process flow smoother. Whether you’re juggling sprites, layers, or events, organizing the interface to meet your needs can save tons of time and enhance your efficiency. Plus, with everything in its rightful place, you can dive right into crafting your next big hit without any distractions. Neat, right?
Tips for Effective Customization
1. Arrange Wisely: When customizing Construct 3 interface panels, start by dragging panels to places where they’re most convenient for you. This might mean separating the layout editing tools from the event sheet panel.
2. Use Tabs: If your screen feels cramped, try grouping similar tools together under tabs. This can clear up visual clutter without sacrificing accessibility.
3. Hide Unnecessary Panels: Less is more! Hide panels you rarely use. This gives a cleaner workspace and reduces distractions.
4. Save Your Layout: Once you find a setup you love, save it! Construct 3 allows you to save your custom layout so you won’t lose it after exiting.
5. Test Different Configurations: Don’t be afraid of experimentation. Test different setups to discover what truly optimizes your workflow in Construct 3.
Digging Deeper Into Customization
After mastering the basics of customizing Construct 3 interface panels, let’s delve deeper! Did you know you can adjust panel sizes to catch even the minutest details of your project? You can resize the layers or properties panel for better visibility. This level of detail may seem minor, but it can greatly influence how you interact with your projects. Also, try out docked vs. floating panels. A docked panel can be perfect for fixed toolsets like layers, while floating panels are great for mobile elements you need to check sporadically.
When you’re deep in design mode, it’s a pleasure to have everything placed just where you need it. Customizing interfaces isn’t just a nerdy pastime, it’s about promoting efficiency and creativity. Moreover, panel customization encourages you to engage with the tool at a deeper level, understanding more about the vast capabilities Construct 3 has to offer.
The Benefits of a Personalized Workspace
Customizing Construct 3 interface panels isn’t just about aesthetics; it boosts productivity. With a tailored layout, immediate access to crucial tools becomes effortless. It’s like having a workspace personalized just for you, where every click is intentional and precise. This harmony ensures you remain focused on game mechanics and less on searching for tools.
Read Now : **ai-powered Character Behavior**
The advantages of customizing Construct 3 interface panels aren’t limited to professional game developers. Even hobbyists can experience a significant boost in their creative flow. Whether you’re designing a complex RPG or a simple platformer, having a workspace that complements your style can transform your entire development experience. It’s the small changes that often yield the greatest benefits.
Best Practices for Interface Customization
Customizing Construct 3 interface panels requires some keen insight into your workflow. Prioritize the panels you frequently use by placing them within arm’s reach. This means keeping your event editor and layout viewing windows adjacent, making the jump from design to execution seamless.
Customizing requires a bit of patience. Give yourself time to adapt to new layouts. If something feels off, don’t hesitate to tweak it further. Lastly, remember to occasionally review your setup. As your skills grow or your project’s requirements change, your workspace should evolve too. This iterative approach ensures longevity and continued productivity.
Personalizing Construct 3 for Your Needs
As you embark on the journey of customizing Construct 3 interface panels, remember it’s all about personal preference. Are you someone who enjoys a minimalist layout, or do you prefer having all your tools on display? Both designs have their merits. Tailor your workspace according to what feels natural to you.
When I first started tinkering with layouts, I was overwhelmed by the options. It took some trial and error, but finding the right setup was like uncovering a hidden treasure. Not only did it make development more enjoyable, but it also amplified my creative ideas. So, jump right in and make Construct 3 truly yours!
Wrapping Things Up
In the end, customizing Construct 3 interface panels is all about creating a workspace that feels like home. Whether you’re new to the game development scene or an experienced pro, having an interface that adapts to your workflow is crucial. With a few tweaks here and there, you can optimize your development process and watch your creativity soar.
Remember, there’s no one-size-fits-all solution. The beauty of customizing Construct 3 interface panels is that it allows you to mold the tool according to your unique style. So go ahead, explore the possibilities, make mistakes, learn, and most importantly, have fun! Your perfect workspace is just a customization away.