Hey there, fellow RPG enthusiasts! Ready to dive into the world of RPG Maker with me? Whether you’re a complete newbie or just looking to refresh your skills, this guide will help you create your own game from scratch. So, grab your favorite drink, get comfy, and let’s start this exciting journey together. Trust me, it’s going to be fun, and by the end of it, you might just have your very own epic adventure game to share with friends.
Read Now : Comparative Study Of Game Engines
Getting Started with RPG Maker
Starting out with RPG Maker might seem a little daunting, but don’t worry—I’ve got your back! This step-by-step RPG Maker walkthrough will guide you through everything you need to know to get started. First things first, you’ll want to pick the right version for you. RPG Maker MV is a popular choice for its balance between features and ease of use. Once you’ve installed it, familiarize yourself with the interface. It might look complex at first, but you’ll soon discover its logic. The key areas to focus on are the map editor, database, and event editor. In this step-by-step RPG Maker walkthrough, we’ll cover how to create maps, design characters, and set up game mechanics.
One crucial step is understanding the power of the database. Here, you can create and organize all the elements of your game—from characters to items to skills. This is also where you can define the stats for your heroes and monsters. Remember, crafting a great RPG is all about balance, so take your time with these settings. This step-by-step RPG Maker walkthrough will help you master the database and unlock the full potential of your imagination. Lastly, don’t forget to test your game often. Testing is essential because it allows you to catch any bugs or imbalances early. Plus, playing your game is a great way to experience it from a player’s perspective!
Mapping and Design
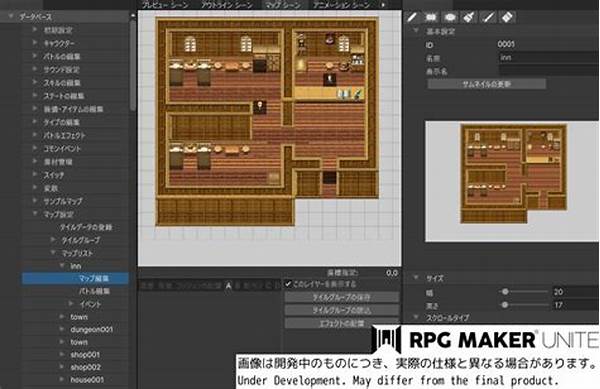
Mapping is like creating your own little world. In this step-by-step RPG Maker walkthrough, you’ll learn how to craft towns, forests, and dungeons. Each tile on the map can spark a player’s imagination, so think creatively. Place buildings, pathways, and secret tunnels strategically to provide a unique experience.
When setting the atmosphere, the right tileset is crucial. The tileset should match the theme of your game. Whether you’re doing a medieval fantasy or an urban adventure, there’s a tileset that suits your needs. With practice, you’ll master how to layer tiles to add depth—making your world come alive.
Next is adding details. Things like trees, rocks, furniture, and other small items bring character to a scene. Remember, less is sometimes more. Avoid cluttering maps with too many objects, as it can be distracting. Balance is key here, as we’ll explore further in this step-by-step RPG Maker walkthrough.
Character Creation and Development
Let’s talk characters, the heart of any RPG. In this step-by-step RPG Maker walkthrough, you’re going to learn how to breathe life into your heroes and villains. Start by defining your main protagonists and antagonists. Give each a backstory, motivations, and unique abilities. These will form the core of your narrative and gameplay.
Once you have your characters sketched out, it’s time to create their sprites and portraits. You can use RPG Maker’s built-in generator or import custom graphics. This is where you can visually represent the character’s personality and role in the story. Make sure their appearance aligns with their traits and storyline. In this step-by-step RPG Maker walkthrough, we’ll delve into how to perfectly blend design and functionality.
Finally, don’t forget about NPCs! These seemingly minor characters can enrich your game’s world. They offer quests, clues, and interactions that make your RPG feel lived-in. Treat them with the same detail as your main characters. Who knows, players might find a favorite side character among them!
Events and Mechanics
Now comes the magic part. Events are the backbone of any RPG, and in this step-by-step RPG Maker walkthrough, you’re going to learn how to make them engaging. Events determine when characters speak, monsters fight, and doors unlock—essentially how players interact with your game.
Understanding conditional branches will empower you to create complex scenarios. You can have different outcomes based on player choices, which adds replayability to your game. This is where a step-by-step RPG Maker walkthrough really shines, explaining each tool in the event editor and how to make them work for you.
Learning about variables and switches is crucial too. They help manage game states. Variables could track a player’s score, while switches can turn events on or off. Such mechanics give your game depth, drawing players into a memorable adventure. Keep experimenting, for sometimes the quirkiest ideas make the most compelling stories.
Read Now : Broadphase And Narrowphase Techniques
Testing and Playtesting
Testing is where your game comes to life or throws a fit! This step-by-step RPG Maker walkthrough wouldn’t be complete without highlighting the importance of testing. Playing your game throughout development helps you identify and fix issues before they become major problems.
Test every map and event meticulously. Run through every possible scenario to see if there are any glitches or logical errors. It’s easy to miss details when you’ve been staring at the same screen for hours, so frequent breaks are advised. Encourage friends or other developers to playtest as well. An outsider’s perspective often reveals things you might have overlooked.
Trial and error isn’t just okay—it’s essential in game development. Embrace feedback and be ready to make changes. Sometimes what seemed brilliant on paper doesn’t translate well into gameplay. This step-by-step RPG Maker walkthrough will motivate you to keep refining until you have a polished game ready to share with the world.
Resources and Community
Don’t shy away from using resources and getting involved with the RPG Maker community. In this step-by-step RPG Maker walkthrough, we’ll explore how forums, tutorials, and online forums can enhance your game-making experience.
The RPG Maker community is filled with people who share your passion. They offer support, resources, and sometimes even free assets. You can exchange ideas, seek advice, or simply find inspiration. From tutorials on specific mechanics to personalized artwork, there’s a wealth of knowledge available.
Joining the community also keeps you motivated. Seeing others create and play games they’ve developed can spark fresh ideas and help get through creative blocks. Whether it’s sharing your progress or helping someone else with their project, being active in the community is rewarding. Your journey through this step-by-step RPG Maker walkthrough is made richer with a community’s support.
Wrapping Up Your Game Journey
So there you have it, folks! Our step-by-step RPG Maker walkthrough has covered everything from getting started to testing and community engagement. The road to creating your RPG may be long, but with patience and creativity, it’s one of the most fulfilling paths you can take. Whether your aim is to recreate your favorite classic or innovate the genre, you’re now equipped to make those dreams come true.
Remember, game-making is a learning process. Each project will teach you new things and sharpen your skills. Don’t rush, enjoy every bit of the journey. Celebrate small victories, like when you finally get that tricky event to work or when your playtesters love a character you designed. In this step-by-step RPG Maker walkthrough, every step counts as part of your creative endeavor.
Lastly, always stay playful and curious. Games are meant to be fun, not only to play but also to create. So go ahead, unleash your imagination, and craft worlds where adventures abound. Who knows, your game might be the next favorite among RPG fans. Happy creating!